Monthly Archives: May 2011

Rewritable ID Card Printing

Many of the ID card printers recently released offer the feature of rewritable ID card printing.  Many ID card operators have no clue what rewritable means in the context of PVC card printing. 

The concept of rewritable card printing allows a card to be customized approximately 500 times during its lifetime.  Using an ID card printer without a ribbon, specialized cards can be personalized for temporary use.  At the end of use, the card can be erased so that it can be re-customized and used at a future time.

Benefits if using rewritable printers are many.  Some of them are:

  • Cost effectiveness as there are no costs relating to ribbons and the cards can be reused up to 500 times.
  • Cutting -edge marketing tool as the card can be customized on the spot.
  • Can be used for for magnetic stripe and contactless applications.

The technology behind this printing comes is explained best from a leading card printer manufacturer, Evolis.  They explain the printing technology of their rewritable ID card printers as follows: 
 

Rerwitable Printers
 Rewritable printing technology does not require a ribbon to personalize cards. The card itself holds a thermosensitive material that turns visible when heated to a temperature of 356° F (180° C) and then rapidly cooled.

The application of a lower temperature, generally in the 230-320° F (110-160° C) range, will erase any color pattern. This process leverages two chemicals that interact with each other according to selected temperature thresholds.

This heating/cooling process is handled thanks to a thermal head, similar to the one used in the Evolis printers. Note that this process can be rolled back, allowing the same card to be reused and reprinted up to 500 times.

Rewritable cards 
 In a blank rewritable card, the thermosensitive material is applied as a plastic layer over a substrate. The most common substrates are PVC for 0.76mm (30 mil) cards and PET for 0.25mm (10 mil) cards.

PVC cards can be supplied with magnetic stripes and contactless chips to support advanced applications. PET cards often come with a magnetic layer on the reverse side of the rewritable surface

For more information about Evolis printers or other ID card printers, contact our ID card experts at 888-485-4696.

Persona C30e – How to Calibrate the Ribbon

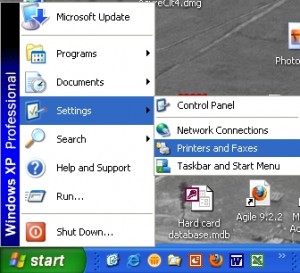
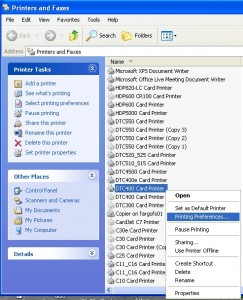
To calibrate the ribbon sensor, click the Start button in the lower left corner of your monitor and select Settings. Then select Printers and Faxes. Depending on your installation of Windows, you may need to go to the Control panels and then select Printers.


In the Printers and Faxes window, Right Click on the driver for your printer and select Printing Preferences from the list.

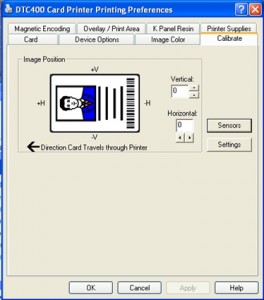
In the Persona C30e Card Printer Printing Preferences window, Select the Calibrate tab and then click the Sensors button.

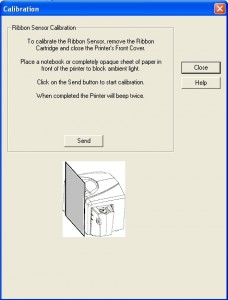
For the C30 and C30e printers follow the instructions in the Calibration window to calibrate the ribbon sensor. When the calibration is complete, the printer will beep twice.

Note that for the C30 or C30e printer, you must cover the front of the printer before clicking the send button to prevent ambient light from entering the printer as it may negatively impact the ribbon calibration process.

For information about Fargo printers or other photo id card systems, contact our ID card experts at 888-485-4696.
Evolis Pebble 4 – All the Lights are On

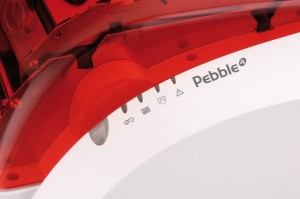
If you are trying to print cards with your Evolis Pebble printer and find it not functioning properly, some setup changes or adjustments may be needed. If you notice that all the lights are on (indicator lights above the main power button/light), follow the steps below to see if the problem can be fixed.

Pebble 4 - All the lights are on

Verify Printer Set-up:

  1. Make sure cards are loaded into the card hopper, the card hopper is properly fitted to the printer, and there are no obstructions in the hopper or the card input path.
  2. Check the card thickness gauge and set it to a value just above the thickness of your cards. (e.g. – if you use standard 30 mil cards, set the gauge lever just above 30, to approximately 32 or 33).
  3. Make sure you have print ribbon remaining on the current spool, and that it is loaded properly. If you are unsure about the proper fitment of the ribbon, there is a manufacturer’s sticker on the inside of the ribbon cover that depicts the proper placement.
  4. Verify that the USB or the network connection is firmly attached to both the printer and the host computer or network jack or switch.
  5. Ensure the power connectors are firmly and properly seated at each of the wall-plug, the AC/DC adapter, and the printer. While doing so, also verify you have the correct power adapter – Evolis original-equipment AC/DC adapters are branded as either “Evolis” or “SwitchBox”, and have output power of 72w (24v @ 3A).

Verify Computer Set-up:

  1. Open the Windows “Devices and Printers” view (“Printers and Faxes” if Windows XP). You can find this link from Windows Control Panel.
  2. See if you have just one, or multiple instances of the Pebble printer listed (e.g. – “Evolis Pebble”, “Evolis Pebble (Copy 1)”, etc.). If multiple instances exist, the ones that are “greyed out” can and should be removed sequentially by right-clicking on each icon, then selecting “Remove this Device”. You should then be left with just one, functional instance of the printer/driver.
  3. Disconnect the power to the printer, or power off with a 2 second push of the printer power button.
  4. Clear the Windows print queue by right-clicking on the Evolis Pebble printer and selecting “See What’s Printing”. When the print queue view opens, if any pending or in-process print jobs are present, click “Printer” on the menu bar, and then click “Cancel All Documents”. Verify with “OK” if requested. Wait for all jobs to clear before closing the queue view.
  5. Determine which ribbon is in the printer and ensure the Windows print-driver is set for use of this ribbon type as follows:
    1. Locate then right-click on your Evolis Pebble printer, then select “Printing preferences”.
    2. Near the top of the “Graphics” tab, you will see a ribbon designation, and a drop-down box that allows you to set the ribbon type manually. Ensure this setting matches the ribbon you have loaded in the printer. The most common settings will be the R3011 ribbon, when printing full-color cards, or R2011 when printing black-only, monochrome cards.
  6. Reconnect or power-up the Pebble printer again.

Confirm the Results:

  1. Once again open the Windows “Devices and Printers” view (“Printers and Faxes” if Windows XP).
  2. Locate the Pebble printer, then right click on it and select “Printing Preferences”.
  3. Select the “Tools” tab, then click the “Test Card” button on the top-left of the screen.
  4. If a test card prints normally, you have verified that the printer is set up properly, and that Windows has been set up properly as well.

Verify the Software Set-up:

There are a variety of card-printer software packages available, so our advice here is limited and generic:

  1. Open the software program you use for card-printing;
  2. In your printer settings, ensure that you are directing card output to the Evolis Pebble printer;
  3. Verify that any document or page set-up options, including portrait/landscape orientation, margins, paper (card) size, and range / record selections have been made properly.
  4. If one card template or file is causing issues, try another to see if it works. If one works, but another does not, your problem is with the setup options of the non-working card file.

Following the steps above will usually resolve a Pebble printer issue when all the lights are on,  If the problem persists, additional steps may be needed to reset the printer. Evolis printers purchased from Safe-Card ID come with free telephone technical support for the life of the printer. If you are such a client and need personalized assistance, we’d be happy to help you! Contact us toll-free at +1 888.485.4696, and have your customer or invoice number handy, along with the printer serial number for fastest service.