Coming Soon: Evolis Badgy200!

Badgy200 and consumable pack

The Badgy200 Solution


Evolis has announced that this fall a new line of their Badgy card printer will be available. The original Badgy was named New Product of the Year 2013 by the Boss Industry Awards given by the BOSS Federation, the trade association serving the UK office supplies and services industry. We hope this indicates good things for the updated version coming out in the next few weeks. The Badgy200 will be an economical solution for small-scale printing needs, allowing education, corporate, and leisure organizations to print in-house, thus saving money and offering instant results.


Badgy200
95 cards/hour (~38 seconds/card)
Edge-to-edge printing
Evolis Badge Studio® + included
100 print consumable pack included
Energy Star® certified
Single side printing (re-insert card for reverse-side printing)
Wide selection of templates available for card design
PC & Mac Compatible
1 year standard warranty


As you can see, the Badgy200 is a good entry-level card printer solution. Evolis Badge Studio®+ allows you to print from a database, making it easy to retain information for reprinting cards and to organize your card printing in batches. The consumable pack sets you up with a ribbon and 30 mil CR-80 PVC cards (100), so you’ll be able to start printing immediately upon set up.

This printer is designed to set up in the same manner as a desktop printer, making it easy for anyone familiar with office equipment to get running quickly.

If you’ve been looking for a budget card printing solution, this new offer from Evolis may be a good fit. As always, to make sure the needs of your organization are met, call Safe-Card ID at +888-485-4696 OR +705-535-5200 for a free consultation with one of our experts! We look forward to hearing from you!

The Basics of Determining Which Type of Ribbon You Need

Let’s face it. There are a lot of options when you’re looking at printer ribbons. Sure, it can be pretty straightforward to determine whether you need a black monochrome (K) ribbon or a full color (YMCK) ribbon, but then you run into the Os, Ts, Fs, and other permutations of the color spectrum. This guide should help you sort through these options.

This is a great place for me to remind you, however, that you are always welcome to call us (toll-free: 1-888-485-4696) and have an expert walk you through this choice. Our first priority is getting you the equipment you need. For those of you who (like me) are a little averse to calling and would rather read, this (lengthy) one is for you:

Step 1: Determine what kind of printer you have. This is crucial to making sure that you get the right ribbon. These are even among the first questions we’ll ask you if you call!

a) The brand of the printer will determine the ribbon brand you need.
b) The model (i.e., Evolis Primacy) will determine what kinds of ribbons you can use.
c) If you have a single-side or dual-side printer, you will need ribbons that are compatible.
d) If you have a laminating module (if you have a Fargo DTC4500e with a laminating module you need different ribbons than if you have a Fargo DTC4500e without one!)

Step 2: Find out if you need ribbons that will print in multiple colors or just one. We have monochrome (one color!) ribbons available in a variety of different colors, so if you need something that you don’t see on our website, just call and we’ll help you out.

It may be tempting to order a full color ribbon “just in case” since black and other individual colors are included, but if all you need is a monochrome black ribbon, you’ll save yourself a lot of money if you just order the K or KO ribbon. In addition, if you are printing barcodes or QR codes, scanners will not consistently read black print that is derived from a combination of yellow, magenta, and cyan (YMC).


KO

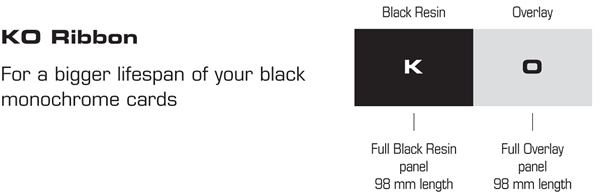
Black Monochrome with Overlay Labeling


One more piece to consider in this step: on what color cards will you be printing? If you have bold or dark color cards, regular color or black ink will not be accurately rendered, so you want to look at a metallic monochrome such as silver, gold, or white-resin, to make sure that your content is clearly visible.

Step 3: Dual or single side printer. If you have a single side printer, you should steer clear of anything with a repeated color (YMCKK, YMCKOK, and YMCKTK are the most common). This extra K (black monochrome) indicates that your ribbon can print color on the front and monochrome black on the back in a single pass, which makes it perfect for most dual side printing. In our product descriptions, we’ve clearly indicated which ribbons can only be used for dual side printing to help you avoid this.


YMCKOK

Dual Side Full Color/Black Ribbon with Overlay Labeling


Luckily, for many folks, a YMCK(O/T) ribbon will work. While it looks like this will only print on one side, your dual side printer will simply use a second set of panels to print on both sides. What’s important to remember about this is that your dual side printer will only get half as many cards as the number of images indicated on the product page (because each side of the card counts as a different image).

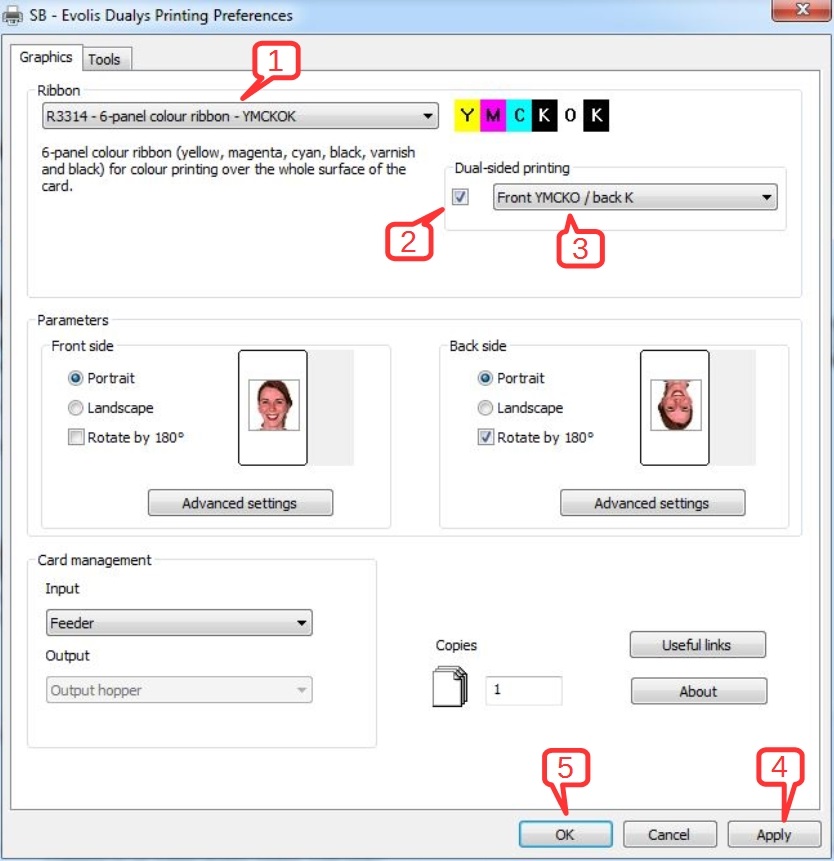
**Reminder: If you’re printing a barcode on the back, make sure to set your print driver to only use the K panel when rendering full-black images on the back—barcode readers won’t consistently read the “composite” black mentioned above.**


YMCKO

Full Color Ribbon with Overlay Labeling


Step 4: Determine what method your printer uses to get the color onto the card. There are two common ones.

a) Direct-to-Card printing: This method transfers ink directly to the card. If you print in color, and don’t have a separate UV overlay that you’re applying, make sure to purchase a ribbon that includes an overlay (O) panel. The UV resistant overlays and varnishes protect the color images on your cards, which will otherwise fade in as little as a few days when exposed to direct sun.
b) Transfer printing: This method prints a reverse image on the underside of the film then fuses the film to the card, negating the need for the overlay panel included on many ribbons (the transfer-film IS the overlay too).
c) I know! I said two! But lamination isn’t a method of getting ink onto your cards. It does, however, provide protection for your image and also keeps you from needing a separate overlay panel on your ribbon cartridge. So if, for example, you’re using an HDP5000 with the laminating option, you can use just the YMCK ribbon, with the lamination layer serving as your UV shield.

This covers the basics of what you need to know to order ribbons for your card printers. If your business has more advanced needs (such as holographic film or fluorescing ribbons), please call to speak to one of our experts at 1-888-485-4696. If you have follow-up questions or would just like more information about a specific option, drop a note in the comments.

Evolis Pebble or Dualys – Printer Won’t Feed A Card

Here’s a problem that occasionally is presented to our technical staff: An Evolis Pebble or Evolis Dualys printer won’t feed a card.

Most Likely Causes when a Printer Won’t Feed a Card:

Evolis printer won't feed a card

Evolis Dualys3

  1. Printer needs a cleaning
  2. Cards sticking together
  3. Thickness gauge set too narrow
  4. Hopper not completely inserted
  5. Cards not loaded properly in hopper
  6. Worn card input roller

More details and suggested steps for resolution:

  1. Needs cleaning: As you use the printer, with each new card inserted, minuscule amounts of dust, lint, and card-manufacturing remnants go into the printer with the card. The printer transport rollers are sticky or tacky to the touch specifically so they can move the card forwards and back during printing. Over time, these contaminants adhere to the rollers which can make them slip on glossy card surfaces. Each cleaning of the printer should consist of using an IPA alcohol impregnated cleaning card, followed by an IPA soaked cleaning wipe, and then finally a pass on the print-head with an IPA alcohol foam-tipped swab. These items are included with a standard Evolis UltraClean Cleaning kit #A5021.
  2. Card sticking together:  This can occur for a variety of reasons, but the most common is static cling. Yes, the force of nature that makes your socks stick to your dress in a dryer, can make PVC cards stick to one-another. If the static bond is stronger that the force imparted on the card by the transport roller, then the printer won’t feed a card. Fortunately, you need only to break the static bond to get things going again. Handling the cards only by their edges, manually separate and shuffle the cards, then reinsert them in the card hopper. The mere act of separating them will dissipate the charge and the cards should feed normally.
  3. The card-thickness gauge is manually set, and is located just behind the top cover of the printer – between it and the card-hopper. There are a series of graduation marks on the gauge. Slide it right or left to set a thickness appropriate for your cards. We recommend setting the gauge to a thickness just a bit larger than your cards. So, if you’re using standard 30-mil cards, set the gauge to about 32-33. Setting this properly ensures cards will be pulled more consistently, should they have slight warping or are slightly thicker than normal.
  4. If the card input hopper is not fully seated, it can also cause mis-feeds or no feed at all. Remove the card hopper, check for and clear any obstructions, then re-seat the card hopper. Press down firmly to ensure it is seated fully.
  5. If the card hopper is not loaded properly, cards will not feed into the printer. Remove the card hopper, then remove and re-insert the cards to ensure they are placed properly. This is also a good time to check for any card static-cling issues, as in #2, above.
  6. Last, but not least, you could have a worn card intake roller. With age and use, the input and transport rollers of all card printers are subject to wear and degradation. The rollers will become hard and slick over time, making it difficult for them to do their jobs. They CAN be replaced, but the labor-portion of such a repair can be very high. This is because it requires the full disassembly and reassembly of the afflicted printer. Contact our service department for more information, should this be the case.

Need more info?

For more information about Evolis card printers – the Evolis Pebble or the Evolis Dualys, contact our ID-card experts toll-free at +1 888.485.4696 (from the US or Canada), or +1 704.535.5200 (elsewhere).

Evolis Dualys – Printing on Two Separate Cards

If you have an Evolis Dualys printer, you are most likely using it to produce custom printed cards designed for dual-side printing. We have seen instances where the Dualys3 will print the first side on one PVC card, then use a second card to print the back side of the card. Obviously this is incorrect, as the intent is to have both images printed on opposite sides of a single card. Fortunately, there is a simple fix.Evolis Dualys3

(note – you must have elevated privileges on your associated Windows user-id to be able to make this change to the print-driver)

To access the screen where you can make the required changes, follow these steps:

  1. Access Windows’ “Devices and Printers” view (“Printers and Faxes” if still operating under Windows XP). This is accessible through Windows Control Panel, or you can type the string within the quotes in the Windows search box.
  2. Find the instance of the Evolis Dualys print-driver within the “Printers” section; right-click on the icon, then select “Printing Preferences”.
  3. In the resultant pop-up window, ensure that the “Graphics” tab is selected.

Now that you are in the right place, follow the 5 steps as outlined, and in the image below:

Setting the Evolis Dualys Printing Preferences:

  1. Ensure your have the proper ribbon selected (“R3314 – 6-panel colour ribbon – YMCKOK”, if printing color front-side images, and black-only back-side images; otherwise, select the ribbon appropriate for your card configuration).
  2. To the right of the ribbon selection box, make sure the box is checked for “Dual-side Printing”.
  3. In the drop-down box to the right of the check-box, set your card-print configuration (“Front YMCKO / back K” if using the R3314 ribbon).
  4. Click on the “Apply” button at the lower-right of the window.
  5. Click on the “OK” button at the lower-middle of the windows.

Finally, reset the printer by disconnecting the power for 5 seconds, then re-applying the power. When the printer comes back to a ready state, you may resume printing.

Need More Info?

The Evolis Pebble and Dualys printers were mainstay printers for Evolis through 2012, and are now replaced by the Evolis Primacy Simplex and Primacy Duplex series printers. For more information and support for all Evolis printers, contact our ID-card experts at +1 888.485.4696.

When to punch your PVC card

We often are asked by clients that are responsible for producing ID cards for their organizations if they should punch required slots in their plastic ID cards prior to printing, or if the printing should be done first.

We recommended that ID cards NOT be punched prior to printing. The act of punching a card-slot leaves a very small raised edge on one side of the card. Though practically invisible, this raised edge can almost always be felt with your finger-tip – making for a potential problem. If the raised edge should come in contact with your device’s print-head during the printing process, the print-head itself can be damaged. If the raised edge is significant enough, it could happen after just a few prints. But even a small and subtle raised-edge can cause problems over time, as card after card contacting the print-head can cause abrasions and scratches. And, as replacement print-heads for most ID card printers cost $500 or more, we strongly recommend that card printing occurs prior to punching the cards’ slots.

Similarly, we also recommend against the use of pre-punched cards. Although the large industrial presses and punches used by card manufacturers are significantly better than light-office versions, they still can leave the same raised edges that can cause irreversible damage. If you MUST use pre-punched or die-cut cards, then we further recommend considering a re-transfer style printer (like the Evolis Avansia or Fargo HDP5000). Due to the method of printing, re-transfer printers are much more tolerant of pre-cut cards than are DTC (direct-to card) printers.

For specific questions regarding your ID card printer system, contact our expert staff toll-free at +1 888.485.4696.

Scan Station Mobile Now Available from Jolly Technologies


Scan Station Mobile is Jolly’s new mobile tracking solution for performing actions typically performed using Jolly’s desktop software on a handheld device. The primary features are:

  • View Record Information
  • Check In
  • Check Out
  • Evacuation Report

This creates a new level of convenience and flexibility for user of Jolly products during events. Scan Station Mobile will work with any Jolly tracking product that is configured to use the full version of Jolly Server.

Scan Station Mobile supports most identification technologies including 1D barcodes, 2D barcodes, RFID HF and magnetic stripe. A CompactFlash card supporting the technology is required.

For more information on how to incorporate a mobile scan station into you event tracking give the experts at safe-Card ID Services a call.

Evolis Primacy – How to Do a Routine Printhead Cleaning

Below you will find a video illustrating the correct way to complete a routine print-head cleaning using a cleaning card on the Evolis Primacy ID card printer.

1.  Open the top printer lid.
2.  Remove the print cartridge.
3.  Close the printer lid.
4.  Open the cardstock hopper and remove the cards.
5.  Shift the card thickness gauge to the right (“Max”).
6.  Put the cleaning card in the card input area.
7.  Turn the cleaning cycle on.
8.  Remove the cleaning card from the card output hopper.
9.  Open the top printer lid.
10. Replace the print cartridge.
11. Close the lid.
12. Open the card-stock hopper and load with your standard cards.
13. Shift the card thickness gauge to the correct card thickness for your cards.
14. Close the hopper.

Contact our ID card experts at 704-535-5200 for Evolis Primacy supplies and information.

Evolis Primacy – How to Do an Advanced Printer Cleaning

Following is a video of cleaning instructions illustrating how to properly clean the Evolis Primacy printer using an Evolis cleaning kit.

1. Open the lid on the top of the printer.
2. Remove the print ribbon.
3. Close the lid.
4. Open the card intake hopper.
5. Remove cardstock.
6. Shift the card thickness guage all the way to the right.
7. Open a cleaning T card.
8. Push the printer on button.
9. Insert the T card in the place where cards enter the printer.
10.When the strip ejects, place a cleaning card in the cardstock intake area.
11.When finished, the card will eject in the output hopper.
12.Open the lid on the top of the printer.
13.Replace the ribbon removed in step 2.
14.Close the lid.
15.Open the card hopper and replace the cardstock.
16.Shift the card thickness guage to the correct thickness for your cards.
17.Close the card hopper.

 For information about the Evolis Primacy printer, our ID experts are available toll free at 888-485-4696.

Ten Tips for Custom ID Card Design and Printing (Part 2)

Today we continue our discussion on the components that make for a unique and fully functional ID Card or Badge that incorporates all the features needed to serve as an important feature of workplace security. The next five are as follows:

6. Durability

ID cards are made of durable PVC and can last up to five years. These long-wearing materials have been proven to last long after paper ID cards are in the recycle bin. They are also more difficult to copy since an ID printer is required to print a PVC card. If additional durability is required, composite cards that are a blend of PVC allow for additional flexibility. These cards are great for fire and police departments.

7. Encoding

Printer and card functionality allow encoded information about the user to be included on the card through the use of barcodes, magnetic stripes, RFID tags and smart chips. These features allow an organization to sync their identification with building access or time and attendance programs. Combined with the right hardware they can approve or deny access to, doors, systems and other important areas of a company.

8. Signatures & Fingerprints

If a photo isn’t enough to visually identify an employee, include a copy of the authorized employee’s fingerprint or signature printed on the ID card. These features can be added in a digital format and printed right on a card.

9. Enhanced Security

Enhanced security is a desired quality of employee ID cards for some organizations. Various enhanced security features can be added to ID cards with the proper equipment and software. One of the easiest is a either a custom or generic holographic overlay. A wide range od printers can apply an overlay to a card that makes it virtually impossible to copy. Another advanced feature would be a holo-mark. These are small foil hologram that can be ordered on blank cards or applied by hand.

10. Personal Information

An ID card has a limited amount of space, so the personal information displayed needs to be purposeful. As employees will display their ID cards every day, the cards can be an effective vehicle for communicating job-related certifications and other important information but it all must be done in the confines of the card size.

Not all of these components will be required for your organization and the ID Card you are creating, but it is important to consider them prior to printing. It would be a costly mistake to have to go back and reprint all the cards already issued to include a feature that was not included the first time. Please contact an expert at Safe-Card ID Services for more information about card design features.

Ten Tips for ID Badge Making (Part 1)

Over time ID Badges and Cards have become an increasingly important part of facility and workplace safety, and it’s nearly impossible to walk into an office without one. Organizations require all personnel to display an ID to easily identify who does and does not belong in the location.

Creating the right card is imperative to achieving security goals. By considering the first five of these ten ID card components, organizations can easily create the ID card that meets their needs.

1. Organization Logo

Not only does including your logo add a level of visual security to your card it can act as a walking billboard for your company. A corporate logo is a highly recognizable image by employees and security personnel. By incorporating your logo into the ID card design, it will be more difficult for fraudulent cards to be created.

2. Design

Take your time when designing your card so as to include all the security and identification features required. When done right an effective ID card design is both attractive and functional. Employees will be proud to display their association with the organization.

3. Single and Dual-Sided

The amount of information you decide to include in your card design will help determine if the design should be single or dual sided. Obviously, information that needs to be readily available and visible should go on the front of the design. While a dual sided card can allow for the inclusion of a mission statement or important phone numbers.

4. Orientation

ID Cards can be printed and displayed either horizontally or vertically, impacting how they are worn by employees. It is important to consider the different scenarios where ID Cards will be used when considering orientation. Also, do not forget to make an allowance for a slot punch if required in the design.

5. Employee Pictures

Almost all ID Cards include a picture of the employee on the front of the card. This feature makes the card unique to the individual employee and it should be easily visible. See our previous blogs on how to take a great ID Card Photo with the HD Image Cam Pro.

In part 2 of this article we will look at the next five important components to consider when designing an ID Card. They include, encoding, durability, signatures, personal information and other enhanced features. As always, contact an expert at Safe-Card ID Services to learn more.