Jolly Technologies has released updated versions of their identity software, ID Flow and also Lobby Track. The new editions contain the following feature:
Lobby Track can also now store signatures in a file folder for an audit trail. The signature capture is completed at check in and helps to validate that the actual cardholder is checking in or out. A popular application of this feature is time and attendance use where the company is concerned that other employees may be signing someone in and out for their payroll documentation.
Lobby Track Online Registration Module features the capability of sending registration confirmation emails containing a barcode. containing information to be used for fast check-in.
If you currently have a support plan with Jolly for your software, the upgrade version is free. If your support plan has ended or you did not purchase one, you may upgrade your software version for an upgrade fee. Please contact our ID experts at 888-485-4696 if you would like additional information about ID Flow or Lobby Track software.
The above video illustrates how to enter information for card printing and how to configure your workstation.
To start enrollment, there are three simple common steps:
1. Enter personal information
2. Capture the photo
3. Print the ID card by clicking on the Print Badge button.
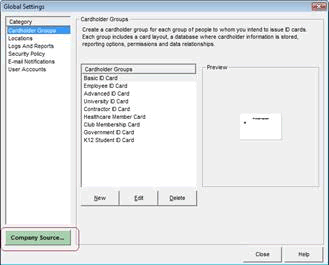
How to Assign Global Settings for Cardholder Groups
1. Click the properties button on the main menu.
2. Select the enrollment tab
We can initialize default values in some software editions.
Initiate the date field with the current date and time.
Duplicate record checks can be performed.
a. Define the matching criteria
b. When a match is found you can add a new record, use the existing record or merge records.
3. ID Flow can use optical character recognition to scan a license, passport or business card.
a. Click configure.
b. Align the scanner fields with the database field.
4. Configure the photo acquisition.
5. Configure the signature capture and fingerprint capture.
6. Access control editions if ID Flow will allow you to configure access control and issues activated cards.
7. Set the card printing rules. Click the badge printing tab.
Name the rule. Click the parameters frame. Click the elliptical button. Create a filter.
8. Record fields can be updated after a card is printed.
9. ID Flow will let you know if you have left any configured features unconfigured.
10. Finished completing the process for the cardholder group.
Configure this workstation’s enrollment steps and devices
1. Click setup.
2. Select configure workstation settings.
3. Click enrollment task link.
4. Enable steps and configure.
5. Select your camera.
6. Download add on modules for the cameras and scanning devises from jollytech.com. This allows flash cameras and auto cropping features with some editions.
7. For pictures, choose the width – height ration and crop box tightness.
8. Select your printer.
9. Disable steps not used in this workstation.
10. You are read to begin enrolling members and issuing ID cards.
11. Find record, run enrollment for step by step process.
Additional ID Flow Training Videos:
ID Flow Software- Text Formatting
ID Flow Software – Working with Records
ID Flow Software- Adding Bar Codes and Magnetic Stripes
ID Flow Software- Working with Images
How to Network Jolly Products Download ID Flow Trial Software to try before you buy.
For additional information about ID Flow or other ID badge software options, contact our ID card experts at 888-485-4696.
Jolly has announced an updated version of their software ID Flow, Lobby Track, Label Flow and Asset Track to version 5.03. There are many highlights and features of this new version that will provide premium features that will enhance user experience. Updated features include:
Features Added:
– Support for S2 Access Control System
– Support for DSX Access Control System
– Support for Topaz optical fingerprint scanners
– Link Lobby Track user accounts to Active Directory user accounts
– Improved Oracle support
– Populate record forms by scanning the 2D barcode or magnetic stripe on a North American driver’s license or ID card
Enhancements:
– Configure multiple Active Directory searches for Host Lookup
– Improved support for non-western languages and fonts including Arabic, Cyrillic, Greek, Hebrew and Turkish
– Improved the automatic image reduction feature to support bitmap images
– Enhancement of Topaz signature cropping
– Improved image path support for certain TIF and JPEG images
– Display a results summary after record import
– Support for a 15 digit UID default value
– Attendance log fix for PCs configured to use a comma character instead of a decimal point
The Jolly software upgrade, including ID Flow version 5.03, is available to all supported customers at no additional charge. Customers with earlier releases should contact one of our ID card experts for upgrade details. Assistance with this and other ID card software products is available toll free at 888-485-4696.
If enabled, the configure workstation screen will show at startup. Select launch set up wizard.
or Select setup and then click run set up wizard.
Click Next.
Name the card holder group.
Say yes to import ID design. Browse and select the template you created in the ID Flow Card Designer.
Click the open button. You have the option to use the database the card was designed with or you can use a different database.
Note that if the database is changed, the fields in the template may be affected if they are named differently.
A copy of the design has been imported. Note that if the original is changed, it will need to be re imported for changes to take effect.
Changes can be made to the imported design within the ID card issue center.
Advanced settings globally applied to all work stations accessing this card holder group.
Preview of the design can be used to represent the card holder group by clicking the generate button.
You may import any other graphics or you can leave it blank.
The Record Lookup Tab – allows you to define lookup fields
Enrollment Tab – Define the enrollment steps. Here we can enable the photo step.
Badge Printing Tab – Create print rules and update fields after a record is printed in some editions. Select edits to make changes to the card design .
Logs and Reports Tab – Select in which database the fields are logged.
Workstation Configuration You can designate tasks specific to this workstation. You can configure your workstation settings.
Main Menu – can change the back ground image
Enrollment – select camera and printer
Find Record – provides lookup options. Click ok once your changes are completed and click finish. You may set up unlimited designs and configure unlimited databases.
Additional ID Flow Training Videos:
ID Flow Software- Text Formatting
ID Flow Software – Working with Records
ID Flow Software- Adding Bar Codes and Magnetic Stripes
ID Flow Software- Working with Images
For additional information about ID Flow or other ID Card Software, contact our ID card experts at 888-485-4696.
ID Flow Software is capable of designing quality, custom ID badges. This video illustrates how to work with images when using the software to design a card.
How to Insert Images Into your ID Card Template
Insert a Fixed Image from a File.
Click the colored image tool.
With your mouse, draw the approximate image area.
Select fixed image from the file.
Then, browse to select your image. More than 20 image file types are supported.
Click the select button.
Click OK.
Add A Background to Your Card
Double click off to the side of your template or click the document properties icon.
Check background image.
Then, browse and select the file.
or
Import the background image as a seperate layer to use blending effects.
Click show layers.
Click the plus button to add another layer.
Then, click the down arrow to move the layer under other layers. Design layers stack like sheets of paper.
Click the image tool and draw an image box.
Select the fixed image from file.
Browse and select the image file.
On the properties tab, uncheck the maintain aspect ratio.
Click ok.
Use the stretching tool to stretch the image to the borders of the template.
The opacity of the image can be controlled in the layers dialog.
Variable Image from the Database
Hold the shift key down while you draw the image area and you will draw a perfect square.
Select variable image from the database.
Select your image field. In this instance it is photo.
Select the live data checkbox to see the template with the database record.
If the image background is reasonably consistent, it can be removed.
Double click on the image.
On the properties tab, check remove background and give the feature a tolerance. About 10 usualy works well.
Background removal works best with images are take with a blue or green screen backdrop.
Hold the shift key down to resize while retaining aspect.
Alignment tools help you place your objects
Repeat the background removal process to remove the background from the logo.
Alternatively, variable images may be pulled from a file. Select variable image from file or internet.
Click insert folder path and insert folder. Insert the database field or fields by which the image is named. In this case the image was named by first and last name.
Lastly, be sure to include the images file extension.
Images Obtained at Print Time.
Draw the image place holder.
Select image captured or selected at print time.
To preconfigure a capture device, select advanced options and select the camera or capture device.
The placeholder will appear on the template. You will be prompted to take a photo during the print process.
The photo will not be stored anywhere and will not able to be reprinted.
Additional ID Flow Training Videos:
ID Flow Software- Text Formatting
ID Flow Software – Working with Records
ID Flow Software- Adding Bar Codes and Magnetic Stripes
ID Flow Software- Working with Images
Safe-Card ID provides photo ID card systems, ID card printers, ID card software, PVC cards and ID badge holders and other ID card supplies. Contact us at 888-485-4696. We look forward to hearing from you soon.
If you are looking to print ID cards for your organization, you are likely asking yourself: “What software will work best for my specific needs?”
At Safe-Card ID Services, we recognize that requirements can and do vary from client to client. Our experts are trained to assist clients in making the best choice possible, paying special attention to each unique situation. To this end, it is helpful to know a bit about the options prior to talking with us regarding the available choices. Your choice would then be driven by some combination of features and costs.
Some typical product requirements and features to consider include:
Do you need to retain data for each card printed, so that it can be recalled and updated and/or reprinted on-demand?
Would you need connect directly to an existing data-source, to eliminate the need to maintain data in two places, and reduce the time and potential for keystroke errors if entered manually?
Will you need any special encoding on your cards, such as mag-stripes, bar-codes, QR-codes, or the encoding of access-cards or SmartCards?
Will you operate on a Windows or OS-X platform?
Will multiple users need to access the software and printer, possibly including simultaneous access?
If you are looking for the absolute least-expensive way to make ID cards, and are technically adept in the advanced use of program such as Adobe Photoshop(R) or Acrobat(R), or even Microsoft Word(R), you can design ID cards and templates within them. This is true, whether you are using a Windows-based PC or Apple’s MAC/OS-X line. The drawback, or course, is that these programs are not purpose-built or optimized for the design and production of ID cards. That usually means many additional minutes or hours of work are required when compared with the use of a dedicated ID card software package. This then becomes both an initial cost, and and ongoing expense.
To simplify the ID badge making process, Safe-Card ID recommends using one of the various ID card software programs available in the market. These products are specifically developed to make it easy to design and print standard-sized ID cards. Being purpose-built, these programs include simple tools that users access to add static or variable elements to their ID card designs, including text boxes, photo fields, logos, background images, barcodes, and more. Static items (those items that will be the same for every card printed) are set such that all cards will have a consistent look. The variable fields would represent information that is unique to each card-holder, including things such as names, titles, individualized photos, and .
The software programs carried by Safe-Card ID are compatible with nearly any of the currently available card printers. They are also generally backwards-compatible with printers made within the last 5 years.
Basic Software Options: The entry level software for most ID card software is able to accommodate ID card needs of low volumes. Full color capabilities, photo imports, bar-code set up options, and more are generally found in this software. In some instances, a basic software packaged comes bundled with the purchase of a new ID printer. Basic versions often include some limits or restrictions including, for example: the number of data fields; the number of data-records stored, the number of available fonts, and/or the ability to add encoded items.
Mid-tier Software Options: Upgraded software options include all of the features included in the basic ID card software, and then add benefits, such as inclusion of an internal database, unlimited record storage, and some basic encoding abilities. Including an internal database allows users to quickly search, find & reprint cards, including printing in batches. It also facilitates the production of business reports. Often the database can be imported and exported for use in other software programs.
Advanced Software Options: Advanced versions of ID card software have capabilities typically needed in larger organizations. These might include the ability to share the database across multiple users, establishing direct links to data-sources, such as .txt, .csv,. .xls, flat-files, SQL and MSAccess databases, or even direct ODBC links. Additionally, more recent releases include the ability to directly encode access cards, SmartCard (on supported printers). These added features make advanced software versions perfect for high-volumes, and high levels of security.
The current ID card software applications that we recommend most often are Asure ID v7 (from HID Global), ID Flow 7 (from Jolly Technologies), and cardPresso v1.x (from cardPresso). Each company has a demo version available at their respective websites. We recommend that you download them and test out the feel of the interface and the options available. You can find links to the downloads below:
Adding Bar Codes and Magnetic Stripes through the ID Flow Software
ID Flow Software provides the capabilities of adding bar codes and encoding magnetic stripes on custom printed identification cards. The following video demonstrates 1D and 2D bar coding as well as how to encode a magentic stripe through the card software.
The above video describes how to insert and format barcodes and magnetic stripes:
1D Barcodes
1. Click on the 1D barcode tool.
2. Draw the bar code area on the card surface displayed on the monitor with your mouse.
3. The properties interface will automatically open allowing you to add data, select your bar code type, select readable text and select specific reader specifications.
2D Barcodes
1. Click on the 2D barcode tool.
2. Place and size the bar code area on the card surface with your mouse.
3. The properties interface will open allowing you to add data, select the bar code type, select readable text and select specific reader specifications.
Encoding magnetic stripes
1. Click on the magnetic stripe.
2. Enable the tracks needed and add data to each.
3. View the backside of the card to see a rendering.
4. Use a printer with a magnetic stripe encoding module and cards with a mag stripe to encode the cards
Additional ID Flow Training Videos:
ID Flow Software- Text Formatting
ID Flow Software – Working with Records
ID Flow Software- Working with Images
For additional information about ID Flow or other ID card software products, contact our software experts at 888-485-4696.
Learn how to format text when designing a custom ID card with ID Flow software.
FOR STATIC TEXT
1. Click on the T icon.
2. With your mouse, draw an approximate text box and type in text in the white area.
3. Highlight the text to format.
4. You may click on the color box to change the text color and then click ok.
5. If you click on the properties tab, you may select a desired style.
6. Use the adjustment tools to center the text.
FOR TEXT FROM THE DATABASE
1. Click on the T icon.
2. Draw a text box on the card layout.
3. In the text dialogue, click the plus field, select database field and then select the fields desired.
4. Alignment tools are provided in the text dialogue box.
5. On the properties tab, uncheck the word wrap and then click ok. The placeholders now appear in the template.
6. Adjust the size of the text box to clean up the template.
7. Click the live data checkbox to see your design using a record from the database (to edit, double click the text box & adjust as needed).
This video also demonstrates how to combine static and variable text. The orientation of the text can also be changed as demonstrated in the video.
For additional information about ID Flow or other ID card software products, contact our software experts at 888-485-4696.
Learn about Working with Records in ID Flow Software
The video above walks step by step through a number of different database, record and picture adjustments that can be made with ID Flow software. This five plus minute video is packed with some of the following information:
Change field order and field properties (.15)
Fields can be moved with a mouse (.29)
How to change placement of the caption (.36)
How to change filed width (.45)
How to format text (1.04)
How to create drop down lists (1.20)
Photo information (1.43)
Advanced searches and sorting (3.17)
Create and clear filters (3.30)
Spreadsheet viewing (3.56)
Import/Export information (4.14)
For additional information about ID Flow or other ID card software products, contact our software experts at 888-485-4696.
Instructions to network Jolly software products are as follows:
Moving the Company Source (the central networking file) to a network server
1. Load the software on a workstation
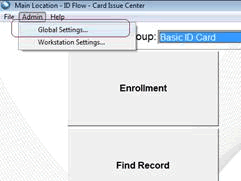
2. In ID Flow Card Issue Center, click Global Settings
3. Click on Company Source
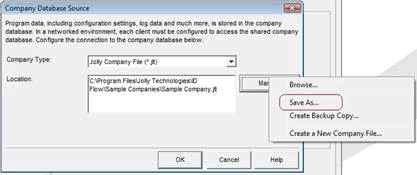
4. Click “Manage” then “Save As” and save the company file to a Server Location
5. To network a second workstation, go through the same steps and at the final step, select “Browse” instead of “Save As” and browse to the Company.jlt file that you moved in the previous step. The software is now networked.
Moving Cardholder Databases to a Network Server
1. By default the sample company database is stored on:
C:/program files/jolly technologies/id flow/sample databases/sample database.mdb
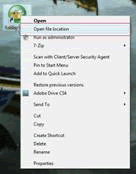
In Windows 7 and Vista the shortcut to get there is to right click on the ID Flow or Lobby Track Icon and select “Open File Location” in Windows XP, right click on the Icon, go to properties, the click file location:
2. Copy the “sample company.mdb” and paste it to the network server location
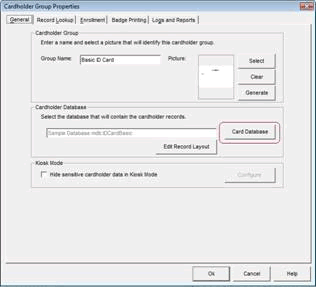
3. Click the “Properties” button to get to the Cardholder Group Properties dialog
(this is a shortcut, you can also get there by clicking edit on the highlighted cardholder group in Global Settings)
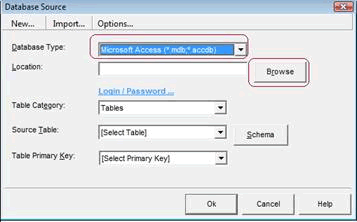
4. Click on the “Card Database” button
5. Change the database type to Microsoft Access and then browse to the .mdb file you placed on the server
6. On the same dialog above, you will need to select the source table for the cardholder group and then select ID Number for the primary key.
7. If there are more than one cardholder groups the customer is using, repeat steps 1-6 in this section for each cardholder group.
For more Information about ID Flow and Lobby Track, contact our software experts at 888-485-4696.