Tips for Designing School ID Badges

Tragic events in recent history remind us that School ID Badges are an important part of school safety. ID cards not only help identify students and staff, also any authorized visitors to your buildings. To design school ID cards that will help keep students safe, and foster an engaging learning environment, use these tips in your design process.

Incorporate both name and picture.

The primary purpose of a School ID card is to properly identify the individual wearing it, and their authorization to be within your facilities. School ID cards should be designed to prominently feature the both the individual’s name, and their photo. In so doing, you’ll more easily spot fraudulent cards, and quickly recognize if a student or visitor is where they are supposed to be.

Color-code ID cards by grade, class, or building.

Color-coding student and staff ID cards by grade, class, or building makes it easy to identify people in a quick glance. For example, seniors might have a prominent red border around their photo, while juniors might have a green border. This is particularly helpful when students are congregated in larger groups, or filling the halls between classes. Virtually all ID card printing software can incorporate color features as part of an overall card design.

Create visitor ID cards.

Visitor identification is one of the most important features of a school safety strategy. A unique design that clearly designates someone as a visitor should be required at all schools. The visitor should not only be required to check in and out but also to prominently display the ID badge at all times when on campus, and return it when checking out.

Require Everyone to Wear their ID Badges.

Finally, you should require all staff, students & visitors to wear their school ID cards at all times. Without this requirement – and an enforcement mechanism – you are creating a lax environment, which diminishes everyone’s safety. One way to maximize participation and “buy-in” is to make the ID card an integral part a daily routine at school. This could be as simple as requiring it be shown at the cafeteria or library, or directly tying it into other systems through use of a printed bar-code or QR-code.

We hope these quick tips can help you shape an effective program at your own school. If you have questions, or would like our expert advice, feel free to give us call toll-free at 888.485.4696.

cardPresso Software Update Now Available

cardPresso Software Update 1.6.9

CHARLOTTE, NC | 11-SEP-2018 / A new cardPresso software update has been released as a free upgrade to licensed users of their product. Version 1.6.9 of the popular ID-card design and printing software is available for download directly from the cardPresso website.

cardPresso software update for all 5 editionsHighlights of this cardPresso software update include:

    • Fixed a bug affecting some Mac OS-X users when using Excel sheets as a data source;
    • Adds formal support for the Fargo DTC1500 printer;
    • Adds formal support for the Evolis Edikio Access and Edikio Flex printer models;
    • Fixed an issue affecting some users of the Datacard SD360 magnetic encoding printers, where a finished card would not eject properly.

As a reminder, all cardPresso editions support USB-attached webcams and digital cameras that have compliant Directshow, WIA/TWAIN, and/or UVC drivers. For example, our popular HD Image Cam Pro remains fully compatible with all cardPresso editions.

The Bottom Line

In summary, this cardPresso software update makes cardPresso easier to use and offers more ways to connect with your information and hardware. This free update will help streamline your badge making process.

The Safe-Card ID Service Promise

Safe-Card ID is proud to offer free telephone-based support for our clients. Our experts are happy to help clients with any update issues, or to answer any questions about the information above! You can reach us toll-free at +1 888.485.4696 (US & Canada), or +1 704-535-5200 from other locations.

New Firmware from Evolis

As part of its continuous improvement policy, Evolis has recently released new firmware version 1801 for their main printer lines. Keeping your firmware up-to-date helps ensure that your printer works at peak performance. Often clients with out of date firmware will have trouble with their printer recognizing new ribbons or interacting with their computers. By keeping your firmware current, you can avoid many of these difficulties.

To update your firmware, please visit the Drivers & Support page on the Evolis website. Once there, simply select your printer model and scroll to the firmware downloads section. New firmware is available for the Evolis Primacy (all models), Evolis Zenius, Evolis Avansia, and Evolis Badgy 100 and 200 printers.

Note that we recommend you update your Evolis printer drivers to the latest version as well. The driver update program is located right alongside the firmware update on the Evolis website.

And, for our regular clients, you can always call us for free technical support or assistance in performing these upgrades. You can reach our experts toll-free at +1 888.485.4696, or direct dialing at +1 704.535.5200.

Retransfer vs. Direct-to-Card Printers

Retransfer vs. direct-to-card printers: when considering how you want to produce your highest-grade, professional ID-cards, you must decide between the two. The announcement of Evolis’s Avansia retransfer printer in 2015 raised a key question among many clients: What is the difference between a retransfer printer and a direct-to-card printer?

The short answer? It’s all about how the printer applies your card design to the ID-card. One method first applies the card image to a thin film, and then transfers the complete image onto the card in one pass; the other prints directly onto the surface of the card (I know! I was surprised too! 🙂 ).

Below, we’ve broken this down into 4 sub-questions to compare the two. And we briefly discuss the inner workings of retransfer vs. direct-to-card printers. If you’re more interested in the differences than the inner-workings, feel free to skip the next section.

Retransfer vs. Direct-to-Card Printers: the Methods
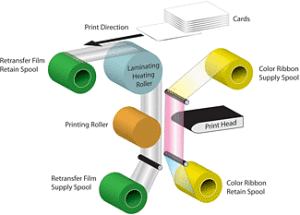
Process Retransfer vs. Direct-to-Card Printers

Retransfer print process image courtesy of Magicard.

With retransfer printers, your card design (images and text) are first printed onto a clear “transfer film”. This is accomplished through a series of passes, one for each color being applied or created. The full, finished card-image is then thermally fused to the card’s surface. The transfer film helps protect the printed card details from abrasion and color fading, due to UV-light sources.

On the other hand, direct-to-card printers place the images and text directly onto the card. With this method, the card and print-ribbon pass over the stationary print-head, sequentially applying yellow, magenta, cyan and black ink (YMCK) to create virtually any color. After applying the color inks, the printer then applies a clear varnish across the full surface of the card, so as to protect the printed image.

What are the differences in results?

By laying the film over the card, a retransfer printer is capable of “over-the-edge” printing that maximizes the card’s surface area. Because the transfer film and applied image can be slightly longer and wider than the card itself, there is no visible margin. If you want a background image that covers the entire card, this is how best to achieve that result. The transfer film also acts as a protective barrier that renders the image slightly more durable.

A direct-to-card printer leaves a very thin border around the edges (only 1mm or so). This “near-to-edge” printing suffices if the card color itself serves as the background color for your ID design, or if full-card coverage is otherwise not required.

HID Global, maker of the Fargo HDP5000, HDPii, HDP5600 & HDP8500 retansfer printers states that retransfer printers create sharper, glossier images (a result of the gloss finish of retransfer films) while the clear varnish overlay applied by direct-to-card printers results in a matte finish. Importantly, the retransfer printing process is more forgiving of slight imperfections in a card’s surface. This is particularly beneficial if you print proximity access cards or smart-cards, as there is often a slight “dimple” on the card surface in-line with the internal electronic components. The retransfer method can also mask minor surface scratches, and even fingerprints.

Direct-to-card printers might not correctly render images over such surface items, resulting in imperfect color(s), or leaving small areas unprinted. Note that you can prevent some causes of these card-surface and print-quality issues by taking measures to protect your unused cards:

  • Handle cards only by their edges to prevent fingerprints from affecting printable surfaces.
  • Store unused cards in a closed container, and in a clean and dry location to avoid dust and surface damage.

What are the similarities?

Both print processes involve application of a full-card image, via thermal print-ribbons to the card surface – the retransfer printer just includes an additional step due to the use of retransfer film.

Both are designed to create durable cards. But all cards are subject to wear. To get the maximum life out of your cards, employ composite cards, add a lamination module to the printer (optional on certain printers), or wear finished cards within protective badge holders.

What materials do they require?

Both printer types require the use of color or monochrome print-ribbons. Retransfer printers additionally require clear retransfer film, on which the card design is first printed and then fused to the card. Typical ribbon designations for retransfer printers include YMCK & YMCKK.

Rather than using a retransfer film, direct-to-card printers use ribbons with an integrated varnish-overlay. This clear vanish overlay is applied as the last step in the print process, to protect the image from wear and fading in sunlight. Typical DTC ribbon designations are: KO, YMCKO, & YMCKOK.

The Bottom Line

Deciding between retransfer and direct-to-card printers really comes down to your use case. The retransfer printer helps you maximize your card’s surface, is more forgiving of imperfections, and is generally regarded as producing a better, glossier image. The direct-to-card printer removes the need for retransfer film and applies your design directly to the card, eliminating a step. Finally, retransfer printers and their supplies generally cost more than direct-to-card printers and their related supplies, so your budget will play a role in deciding which is right for your organization.

At the end of the day, which printer you need is always going to come down to your specific requirements. Hopefully this blog entry will help you think through that process.

Need more info?

Questions? Concerns? Not sure what printer is best for you? Call our ID-card experts toll-free at +1-888-485-4696 (US & Canada), or +1-704-535-5200 (elsewhere) for a free consulation. We are always glad to help!

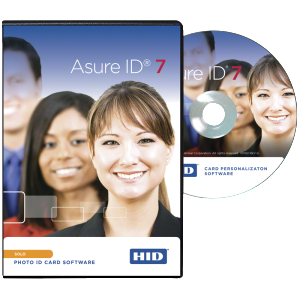
Asure ID Software – Version 7

HID Global regularly updates their Asure ID Software version 7. We encourage users to keep up with these updates to take advantage of new features and prevent problems. The latest release of Asure ID can always be downloaded directly from HID. It is available as a free update for licensed users of Asure ID 2009, and for all earlier releases of Asure ID 7. Users of Asure ID 5 (all versions), should contact us for special upgrade pricing.

asure id softwareFor help installing the update and accessing new shortcuts and functionalities, Asure ID also regularly updates the Asure ID User Guide. It is also available as a free download directly from the HID Global website.

The most recent program updates target increased functionality and support for HID’s ever-expanding access-control systems.

Asure ID Software Recent Release Highlights:

  • Updates to the toolbar and application sidebar to more closely mirror the look and feel of recent Windows releases. This redesign makes learning and using Asure ID easier and more intuitive.
  • Enhancements to accommodate encoding of iClass SE proximity/access credentials.
  • Data-entry and management are enhanced, allowing users to save font sizes and font types for both table and record views, further increasing customization options.
  • Introduction of several keystroke enhancements  to simplify data entry, including the ability to use the “shift-key” to highlight multiple records at once for group or batch actions.
  • Beginning with Asure ID 7.7, the program retains the most recent photo location and cropped size. Users find this change makes it easier to edit photographs and quickly produce photo IDs.
  • Added a quick filter feature that allows users to specify the order of entries.

As a result of these updates, data-entry is smoother and the software allows for better management of databases and data records.

Most notably, as HID expands their ecosystem to include embedded and standalone iClass SE Encoders, they continue to update Asure ID, in part to facilitate access-control system integration. As of Asure ID release 7.7, users can take advantage of iClass SE Encoders, optionally embedded within Fargo ID printers. This includes enabling automatic registration of finished card data to compatible access-control programs.

Need more info?

You can learn more about Asure ID in our dedicated product page, as well as our web-store. If you need assistance applying updates or have other questions, please call to speak with our ID-card experts. They are available toll-free at 888.485.4696 (from US & Canada) or +1 704.535.5200 (elsewhere). At Safe-Card ID®, we are always glad to help!

Evolis Printer – Install an Evolis USB Printer on a Mac

Following are the steps to install an Evolis USB printer on a Mac running OS X version 10.4 through version 10.11.

  1. Prior to starting the installation, make sure you have Administrator rights.
  2. Plug the printer into an open USB port on the Mac and power-on the printer.
  3. Ensure that cards and ribbon are loaded in the printer, and that only the power-light is illuminated following the power-up sequence.
  4. Go to the Evolis Drivers & Support page, then click through to your specific printer model from the available choices.
  5. Scroll down the printer-specific downloads page to locate the Mac OS X driver, and download it to your desktop. Run the setup installation and follow the instructions during the installation process.
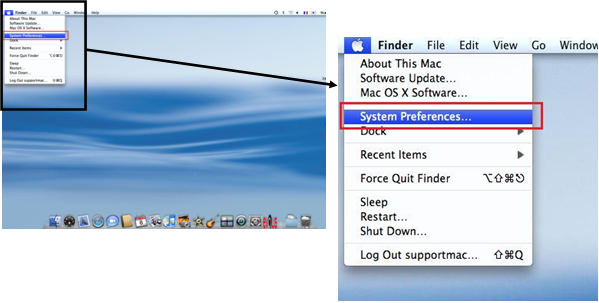
  6. Open the “Apple Menu”, then select System Preferences.Mac Installation
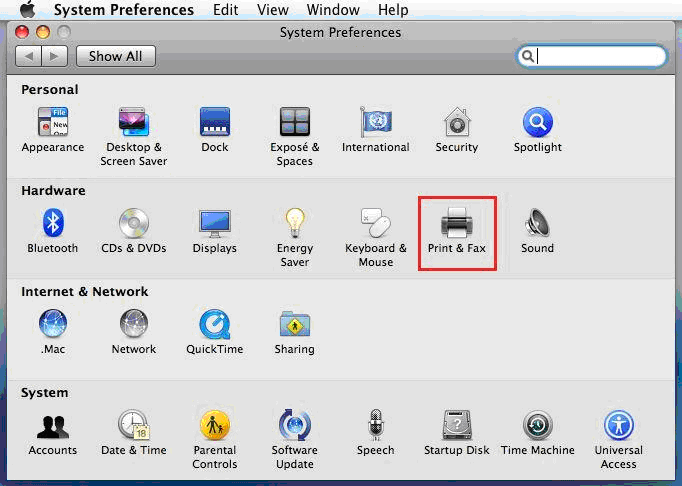
  7. Open Printers and Scanners.Mac Installation
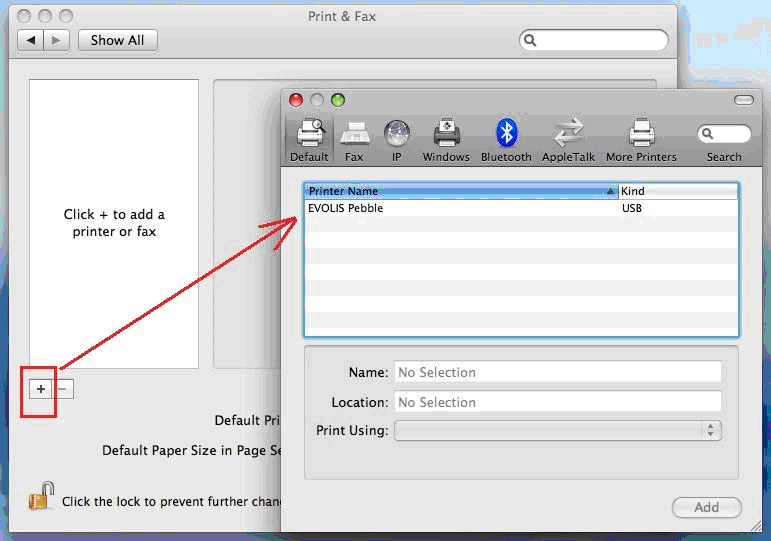
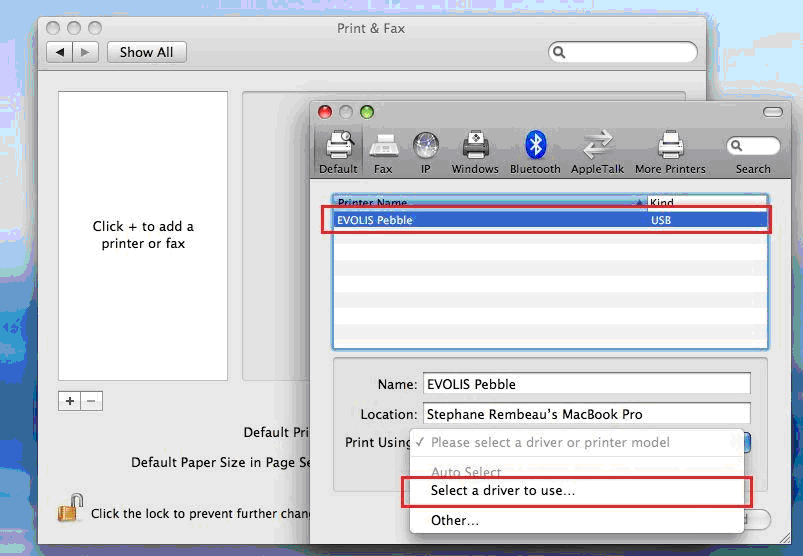
  8.   Click on the + to add a printer. In the resultant pop-up window, your Evolis printer will already be detected and listed. Select the Evolis printer.Mac Installation
  9. In the “Use” box, choose “Select Software”Mac Installation
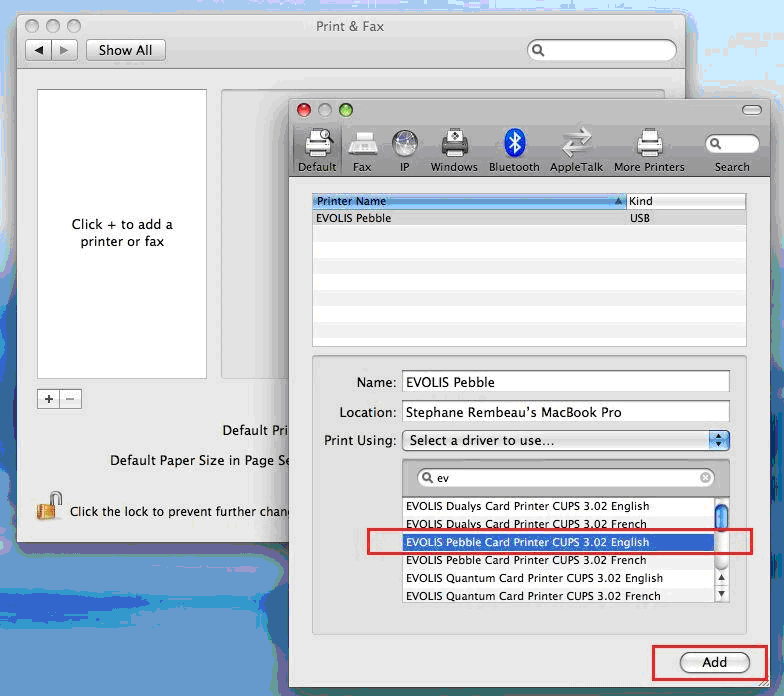
  10. In the drop-down menu, select the Evolis driver and the language you need, then click on “Add” to validate your choice.Mac Installation
  11.   The driver is now ready to be used, and you are ready to begin printing cards.

Congratulations! You’ve now completed the steps required to install an Evolis USB printer on a Mac, and are ready to go!

Other tips:

In your badge-printing software, ensure that the correct driver is selected for the printer, and also check the paper-size settings. Badge creation programs will usually offer “CR80” or “Card” as a standard size. Go to Printer Features to access any Evolis print-driver properties and adjust as necessary.

Need more info?

For more information about Evolis printers, review our blog for other Evolis printer tips and support posts, or call our ID experts toll-free at +1 888.485.4696 (from US & Canada), or +1 704.535.5200 (from other locations)

Asure ID Software Trial Download

Asure ID 7, the current version of HID Global’s industry-leading ID badge design software, is available for a free 30-day trial. In order to access the Asure ID trial, click here and visit the product download page.

Asure ID 7 CoverAsure ID Trial Available in Four Editions*

HID Global’s ID badge-design and badge-printing software provides card issuers with a clean, easy-to-navigate interface, and a complete package of custom card printing options. Because there are 4 available editions, it is easy to find an version to satisfy nearly any type or size organization:

  • Solo Edition* – Simple, entry-level card design software for organizations requiring production for up to 200 database records;
  • Express Edition* – Powerful, stand-alone card design software optimized for single-user environments with virtually limitless data records;
  • Enterprise Edition* – Card design software for multiple workstations that share a common database;
  • Exchange Edition* – Support for more sophisticated secure credential applications, providing advanced smart card functionality and laser engraving.

*Note: Some features of these editions, including advanced database connections and card encoding are not enabled in the Asure ID trial edition. Despite this restriction, you may find the trial useful for familiarizing your users with the software. However, to determine if the software fits your needs, please call one of our experts at +1 704.535.5200.

Regardless of the edition selected, you will find Asure ID is easy to learn and full of features. It provides a wide range of capabilities in card issuance and card management for small and large organizations alike. If you’re unsure whether this software fits your needs, use the 30-day Asure ID trial to test it out.

Need More Info?

For purchasing information, please check out our Asure ID information page, or the Safe-Card ID webstore. Furthermore, we are happy to address your specific questions about ID-card software or ID-card printer systems! Simply contact our staff of ID experts toll-free at +1 888.485.4696 (US & Canada), or +1 704.535.5200 elsewhere.

Asure ID Software – Default User-ID & Password

Asure ID - Default User-ID & Password
A question we often receive in our customer support department is “What is the default user-ID & password for HID Global’s Asure ID card design and printing software?”

In order to access Asure ID, you must provide a user-ID & password each time you use the program. When it is first installed, a default user-ID & password combination for Asure ID is created.  It is best-practice to replace these default values with your own, secure user-ID & password. If you want to secure any personal identification data that appears on your ID-cards, this is particularly important.

In all but Asure ID’s entry-level Solo Edition, you can create separate user-IDs for an administrator user-ID and for non-administrator users. (Solo Edition does not support multiple user-IDs.)

If you have the Exchange Edition of Asure ID, you can also use Microsoft Active Directory / LDAP and implement single sign-on capabilities.

Asure ID Default User-ID & Password:

User Name*= admin
Password*= admin

(*You should input values exactly as they appear–they are case sensitive.)

Need more info?

For more information about Asure ID, or its various editions & features, please don’t hesitate to call and speak with one of our ID experts. We can be reached toll-free at +1 888.485.4696 from the US & Canada, or +1 704.535.5200 elsewhere. Software version & pricing information is also conveniently located elsewhere on our web-site, and in our web-store.

Asure ID product information is also available directly from the HID Global Asure-ID micro-site.

Fargo Printers How-to: Update Drivers and Firmware

All Fargo ID-card printers rely on “Drivers” & “Firmware” from their manufacturer, HID Global. Periodically, you must update drivers & firmware to correct minor faults, enhance functionality, or maintain compatibility with new releases of Windows and other supported operating systems.

Fortunately, Fargo makes it easy to check for updates, and to install them, via a free utility program – the Fargo Workbench Utility. Follow these steps to make sure you have the latest versions for your printer, and to update drivers & firmware. (Note: you must be connected to the internet and have Windows privileges sufficient to install programs and drivers.)

Use the Fargo Workbench Utility to Update Drivers & Firmware

Install Fargo Workbench & Check for Updates

  1. Download and install the Fargo Workbench Utility. Make sure to select the option to launch the program at the conclusion of the installation.
  2. Within Workbench, select your printer in the drop-down box in the top-right of the screen. (Tip: if the printer is not present, ensure that it is powered on and in a ready state, then click the “refresh” icon to the right of the drop-down box and try again.)
  3. Select the “Update Manager” option on the menu bar (far-left choice).
  4. Click the link for “Check for Updates”.
  5. Download available updates to either the drivers or firmware. These appear in the middle of the screen, with a button to the right to download from the Fargo web-site.
  6. Once the downloads are complete, you can update drivers & firmware, one at a time. We recommend that you start with the driver update.

Update Drivers

  1. In the update list, choose the driver update then click “apply update” to install.
  2. Note: installing new drivers may require removing the old drivers first, temporarily disconnecting the printer from your PC, and also re-booting your PC.

Update Firmware

  1. Move on to updating the firmware. Select the appropriate options (in the lower part of the screen) for the firmware and the printers.
  2. Now you can click to apply the firmware upgrade. As the update is occurring, the printer’s front-panel LED lights will flash, or a message will appear models with the LCD information screen indicating the update progress. Additionally, there is a progress indicator within Workbench that will count up from 0% to 100%, indicating completion.
  3. When the update completes, the printer will do a “soft” restart on its own.
  4. After the restart, the printer will come to a normal “Ready” state (assuming you have cards and ribbon loaded).

Now that the printer’s required drivers & firmware are current, you should again verify the correct ribbon setting and resume printing.

For more detailed instructions, including screen shots, you can download a PDF of HID Fargo’s instructions here.

Need more info?

If the above tips don’t get you going again, never fear – we are ready to help. Just reach out to our ID-card experts toll-free at +1 888.485.4696 (US & Canada), or +1 704.535.5200 (elsewhere) for personalized support.


HID Prox Card

HID Prox Card IIHID Prox Card

The HID prox card contains an integrated circuit that a reader on the same frequency scans. As part of an access control system, the card is a critical component in managing secure facilities or networks. When presented to the reader, the card transmits encoded information. A specialized controller or software application interprets this information, then compares it to a set of rules and permissions. These rules allow the software to determine whether or not the card holder should have access to the requested resource.

Types of Prox Devices

The ISO HID prox card combines the printable properties of standard PVC cards with the access control features listed above. While these cards are more expensive than standard PVC cards, most users consider their dual purpose to be a good value.

The clam-shell HID prox card is not a printable prox card. To serve as a visual ID, it requires the application of a printable pressure sensitive card.

Tags and keyfobs cannot serve as visual IDs but use the same technology as other prox devices for access control purposes. These are especially popular in housing developments for access to common areas such as pools, gyms, and laundry facilities.

How to Acquire Prox Devices

Safe-Card ID Services offers HID prox cards that are pre-encoded to match a user’s system specifications. To make issuance easier, many users print on these pre-encoded ISO cards or apply an overlay to clam-shell cards.

A wide range of printers feature optional encoding modules. These modules enable the on-demand encoding of ISO HID prox cards to match the specification of an access control system. Current Fargo printers that can encode HID prox cards are the Fargo HDP5000, Fargo HDP5600, Fargo DTC1250e, Fargo DTC4250e, and Fargo DTC4500e. For information about cards that can be used with identification applications, visit our HID prox-card page.